About Me

My photo
Some facts about us: Together since May 2004, Matt & Kristin Married in May 2009. Between the two of us, we've lived in California, Hawaii, Guam, Japan and met here, in good ol' Virginia. We adopted two mini schnauzers, Hemingway & Mya aka The Pups. We bought our first home in May of 2011 and are ridiculously excited for all the DIY projects ahead of us.

Saturday, June 11, 2011

Removing wallpaper is the worst...

It's a sticky job... but someone's gotta do it.  Half of the master bedroom closet was covered with a textured wallpaper.  It looked like a DIY project gone wrong.  We all know how that goes.  It was bubbling, peeling, bumpy and everything else bad you can think of.  Here is a picture of the type of wallpaper it was.

I broke the blogging rule of taking a picture before I started, so about 10 minutes into peeling back the top layer of wallpaper I took these shots.  The left side of the closet is the wallpapered side.

 Here is Mya helping out... and my fugly toes.

 First I removed as much of the top layer as I could just by peeling it back.  Then I took a spray bottle and filled with hot water and a little bit of soap, just a couple of squirts.  I sprayed the entire wall where the bottom layer of wallpaper was left.  Then I took a spackle knife, started from the bottom and shaved off the wallpaper.  It actually came off really easy!  Be careful though, the glue on the wallpaper is sticky again so you should try to bag it up quickly/immediately if your room is carpeted.


You'd think that after all that we'd just have to paint and all would be well.  But no... it left this hole-ridden, spackled, unsanded mess of a wall.  Apparently that's why they covered it up with wallpaper and the reason for all the bumps and bubbling.


 I called in reinforcements, aka Matt, and respackled and sanded everything.


 Then we painted it good ol' fashion antique white.  Nothing fancy, but definitely an upgrade.


Have you found a DIY job to be much more than you bargained for? 

Friday, June 10, 2011

Let the exterior painting commence!

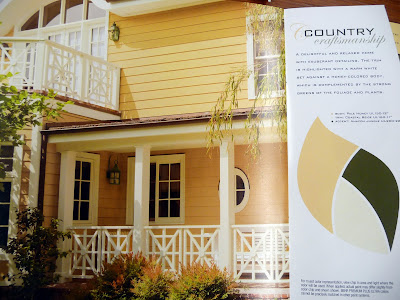
So I have a confession: Our exterior house picture doesn't really depict the actual color of the house.  *Gasp!  I know, I know, scandalous!  Honestly and truly, as I've mentioned before, the house is a not-so-appealing peachy-tan color.  But with the sun hitting the house just right, at just the right time in the morning, it looks very soft pink/off white.  Lighting is everything right?

I've fooled you!  Ha!

Ok, sorry.

Not only is the color something we could live without, it's also faded terribly since it's most likely the original 1991 paint.  Since the first time we saw the house, we knew it needed a fresh coat in a color that was more us.


Enter Pale Honey please!


So, Matt started painting this week.  It's a slow process considering he works full time and has to entertain me by listening to my ramblings or helping with projects when I'm home.  But he's been managing it all and it looks fantastic so far!  I'll share the process once we can do the big reveal.  Unfortunately, he's been painting while I'm at work so I haven't got any "action shots".  I'm only taking pictures after he's quit for the day.  Hopefully he'll take time to tell us all (including me) how it all got done and how much he hated being out there in the sun.  Of course the week he starts this process it's in the upper 90s all week.  He's the man.

The color is from Behr and is shown below with the color code.  We didn't actually go with Behr paint, but got Sherwin Williams to color match it for us.  Matt swears by this particular SW exterior paint.  The picture above is a more accurate depiction of the color, the one below looks a little too dark peach and less yellow. 


Get this, I picked this exact color out of the hundreds of paint chips at Home Depot.  Then I grabbed one of their 5 or 6 page exterior books to see some images for ideas.  I got to the page with the pictures above and knew it was the one.  I hurried and showed Matt while exclaiming "Nevermind that other color, I SOOO love this".  Only to find out it's the same exact color chip I've already given him.  Well, at least I'm consistant.

Anyhoo, I'm so excited for the exterior to get done and put a big fat check mark next to a considerable project.  Onward with bringing the house back to its former glory!

Tuesday, June 7, 2011

I love Guam... and Etsy!

Home is where your heart is and Etsy is where you can find all things handmade.  It's awesome!  Browsing through there for an anniversary gift for Matt, I decided to look up any art from/about Virginia.  I found this adorable print for sale at $14.50 plus $2.50 shipping.  AND you can pick any color from their list for your print.

See this print at http://www.etsy.com/listing/72055414/virginia-state-love-8x10-print-in-custom?ga_search_query=virginia&ga_search_type=user_shop_ttt_id_6110818

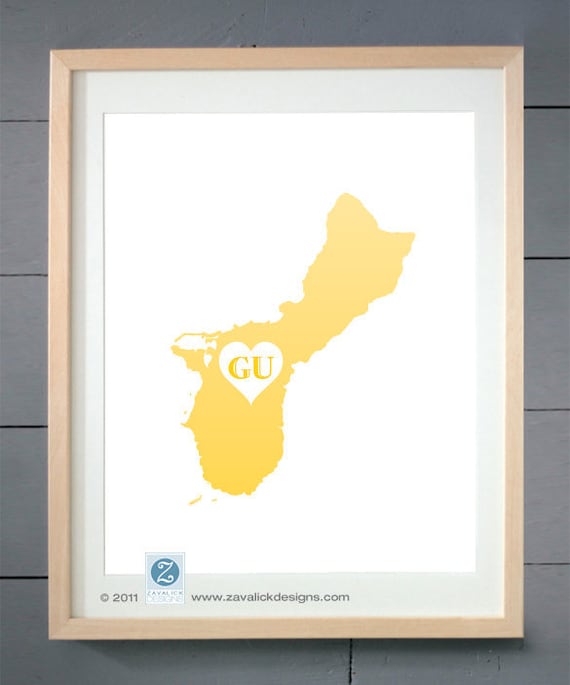
Adorbs, isn't it???  Just before I committed to buy this VA print, I emailed the shop owner, Adrienne Zavalick w/ ZavalickDesigns (see their page here: http://www.etsy.com/people/ZavalickDesigns?ref=ls_profile) to see if they do custom work.  I sent along a map of Guam that I found online.


 Matt is from Guam and I lived there for 5-1/2 years when I was younger.  Yes, 5 and a half.  When you're 13 (that's when I moved to VA), that half meant a lot.  We met in Virginia and didn't know eachother when we lived in Guam.  Pretty extraordinary when the "big" G-U is only 30 miles long and 4 miles wide.  So not knowing eachother there, and meeting here is pretty sweet if you ask me.

ZavalickDesigns was happy to add Guam to their State Love Series since it is a U.S. Territory after all.  And at $17.00 to my door, I'll take it! 

Here is the proof she sent me:


Now here it is in our Kitchen


I love it!  But the frame may end up white (instead of off white/cream) and in the hallway in the near future.  But it'll do for now.  If you're from Guam you know it's hard to find modern art pieces.  Since you can change the color to your preference, it's perfect for anyone.

I didn't get this for free, nor do I know the owner of this store personally.  She just did a great job and I love the print and I think others will too.  Enjoy!

Monday, June 6, 2011

Got Wine?

Corks... 
This post will be short and sweet since this project was quick and easy.  What you need is that pile of white and red wine corks you've been storing in that junk drawer of yours.  Take those and find a wooden box.  You can probably get a really inexpensive one at Michael's or Ben Franklin.  We had one lying around that was the perfect size (my mom gave Matt a Saki set that came in this box). 

I was originally going to do this as a monogrammed "O" but that doesn't look quite appealing in "Cork Font".


If you drink more red wine than white wine, then do your letter or number in white wine corks.  If you drink more white wine than red, then do what I did and use red wine corks for your number/letter.  You don't have to glue them in or make this permanent so you can adjust this as often as you want.  Every year I'm going to change it to match the years we've been married.  We just celebrated our 2 year anniversay this past Monday, May 30th. 


Simple and free!  And TRIPLE BONUS:  You get all that space back from your drawer.  As Sherry from YHL would say  "Amazeballs"!

Wednesday, June 1, 2011

Green with Envy

Envious for a new color pallette that is. 
The eat in kitchen nook colors were OK, but we wanted to spice it up a bit.  We loved the chair rail, so decided to still keep the double tones.

We started with the all around color of the kitchen and top of the nook.  We went with a soft blue (I'll get exact color names soon!)  As for the stripes, originally we were going to do white and tan stripes, but found extra paint leftover from the previous owners.  It was the grey from the master bath.  Blue + grey = Love.


 After Matt went over the green with two coats of the Behr paint, we let it dry over night before I added the white stripes.

What I used:  level, 2 different size envelopes, pencil and painters tape
 Instead of using measuring tape, I used two different size envelopes (junk mail) to measure the chunky grey stripes and thinner white striped area.  That's right, very sophisticated junk mail.  I'm a regular Picasso when it comes to painting.


 After drawing the striped lines in, I used painters tape to line the outside of the grey stripes so I could paint the white stripes in.
Then I painted a couple of coats of white paint and took the painters tape off before it dried all the way(always pull off at an angel, away from the new paint).

DRUM ROLL PLEASE...

Ahhhhh... much better.

There you have it, my first time painting stripes!  PS the stripes were Matt's idea.  Genius!