About Me

My photo
Some facts about us: Together since May 2004, Matt & Kristin Married in May 2009. Between the two of us, we've lived in California, Hawaii, Guam, Japan and met here, in good ol' Virginia. We adopted two mini schnauzers, Hemingway & Mya aka The Pups. We bought our first home in May of 2011 and are ridiculously excited for all the DIY projects ahead of us.

Monday, June 27, 2011

Book Page Wreath

Wanna make something that will cost ya less than 3 bucks and is adorable? Let's do this.


What you'll need: 
  1. Ribbon to hang your wreath
  2. Wreath from your local craft store (I got mine at Ben Franklin)
  3. A book that you no longer use (or buy one at the Goodwill for a buck)
  4. Your glue gun. 
If you don't have a glue gun, you can get one at the dollar store and some glue sticks.  That'll make this project less than 5 bucks total rather than 3, but still worth it and you'll have a handy glue gun for future projects.


Reminder:  Use a book that you think no one else will read... don't use a Twilight book or anything crazy.  :)  Yes, twi-hard fan here.

Now tear out a stack of pages, and tear them in half. 


 Then use your finger and fold the page around it.  The picture below is the after.  And as you can see, I bought a random romance novel from Goodwill since I didn't have any books I could bare to tear up.  Looks spicy and I may have seen some slighty risqué wording.  So I've taken a possibly R rated book and made it into very nice PG wreath.


Press the bottom on your table so that it'll flatted out a bit.  Then use your glue gun and attach to your wreath.  Continue doing so and it'll start to look like this:


And the possibly unnecessary close up shot:


You can either attach the ribbon using your hot glue OR do what I did which was pull it through a twig on the back of the wreath and hot glue the ends together. 


It's been moving around the house the past couple of weeks.  I haven't quite decided where we're going to keep it but I'm sure we'll find the perfect spot. 

If you like the wreath but don't want to make one yourself, I've seen someone selling a version of these on Etsy.  But get ready to spend about $40 + Shipping.

P.S. This would be a fun craft party if you want to get the girls together for some wine and chit chat.  I just might have to do this... Ladies?

Thursday, June 23, 2011

The Black Door is Like the Little Black Dress

Every girl must have one.

When we moved in, we painted the downstairs and upstairs hallway light blue. To be more accurate, I picked the color and Matt and some helpers painted it.  We were planning on painting the door black or white to match it better since it was this red when we moved in.

But the blue just wasn't right. We wanted to have a nice cozy feeling when you walk in, with a modern touch. Matt suggested we paint it. Again. We = he, and he was more than happy to do it.  Apparently, he didn't like it much either...  The blue was officially a color failure.

So we switched it up!  Sherwin Williams Favorite Tan in Eg-shell for the walls and black satin all surface enamel for the door.


Swoon. I lovess it. I didn't know how much I disliked the blue, until I saw this when I came home from work. It's a trillion times better. Yup, a trillion. We still have lots to do: chair rail, molding, frame collage, paint the hardware for the doors (yucky gold right now) and pick an accent color. But for now, these colors are making me giddy. 

Especially the black door.  If you haven't noticed, lately everyone has been adding one black door in their house.  It's an immediate upgrade.  Here's a little advice I read recently:  No matter what color pallette your going for in a room, don't ever leave out black. Whether it's a picture frame, a small table or a vase, throw something black into your room.  It's sleek and it will bring out the rest of the colors in your room.  It definitely did that to the walls in the hallway.

Here's the nook next to the front door (across the hall is the formal living room) before the paint change. PS the onesie is NOT ours, it's a gift for a friend. Don't get any bright ideas. :)


Here it is now:

Not complete by any means, we kinda just through some things in there to see what would fit/look good. I'll post the finished nook when we have a more polished feel to it. Also, the console was a great find I'll get into later. It fits perfectly!  Literally not even a half an inch of space to spare.

So that's it. The front door, entryway and hall color change. It stinks that we had to change the paint only 7 weeks after it was originally completed, but now we're really happy with the color. It also helps that Matt is a trooper and wants the house to be as cozy as I do.

Have you had to repaint anything lately? 
Did this post make you want to break out the little black dress for a night on the town?

Monday, June 20, 2011

With enough spray paint, I could rule the world.

Seriously.  Spray paint makes my world go 'round. 

I got this Lenox ring holder from my good friend Tasha for my bridal shower.  It's super tarnished, which only shows you that I use it often (thanks Tash!).  I could have polished it, but I decided to go with some good ol' fashion spray paint.


I am NO expert, since I just started using the magic product, but I could offer some tips.

1. Shake shake shake.  Seriously, shake the crapola out of it.  Before AND during.
2. Spray onto a piece of cardboard before your item to be sure it's coming out thick.
3. Do NOT take off the little white tip that's on the spray cap.  Not that you would, but I did.  I thought it was like the little round tips that come on your ball point pens that you have to remove before using.  I was WRONG.  Matt laughed.  I did NOT (well not at first).  I was doing my first spray painting project and couldn't figure out why it was spraying every where and dripping big globs every few sprays.  I had a huge mess. 
4. After your done using, turn the can upside down and spray until it comes out clear.  This will ensure there aren't any clogs.

First I used some primer, although you don't have to if you have the Krylon Fusion spray paint that I first introduced to you in my Traveling Treasures Mason Jar post.  You can check that out here.  But I had already used it before realizing it was an extra step I could've skipped.  Then I went over it with the KF spray. 


Here is the finished product.


I also found this great piece at a thrift score.  I snatched it up at $5.  It'll be a perfect jewelry bowl for the bathroom.  I always have a pile of jewelry next to the sink and have been looking for something to help alleviate the mess.  It was perfect.


 But unfortunately, after washing it, it was really discolored around the rim.  I'm not sure if you can tell from the picture, but it was very yellowed.

I hit it up with my trusty spray and it was good as new.


Have you used spray paint to freshen anything up lately?  If not, I urge you to try it out! 

Friday, June 17, 2011

Sewing Machine, Shmowing Machine

Who needs one of those stankin' machines when they have iron-on mending tape? Ok ok, I'm only bitter because I can't sew and am jealous of all of you who can. 

Matt wasn't a huge fan of the turquoise pillows in the family room that you saw during my Suitcase Side Table reveal.  You can check that out here.


I have to agree with the hubby, those pillow covers are just a little too much for the feel we're going for. Plus there was a big ink stain on one of them.  Shhhhhh, dont' tell anyone.

So, when i stumbled on this "Easy No Sew Pillow Cover" article I had to try it out.  Check it out here.

Even better, the article shows you how to make a removable pillow cover.  All you need is fabric, iron on adhesive and an iron. 

In order to do a normal sized 18" x 18" square pillow, you'd need one 19" x 19" piece of fabric and two 19"x14" pieces of fabric.  Basically, whatever size pillow case you want to make, add an inch to each size for the mending portion.

I found this fabulous fabric at Hancock Fabric in Midlothian.  It was on sale for less than 9 bucks a yard, and that's all I needed for two pillows.


Take the two small pieces and iron a seam at one end of each piece.  These will be for the portion of pillow that will make it removable.


Take your iron-on hemming tape, measure and cut it to fit under the seam.  Then follow the instructions on your package regarding the amount of time to iron each side of the seam.


Take the big piece of fabric and lay it face UP on your ironing board.  Take each of the smaller pieces and lay them face down with the two hemmed sides overlapping in the middle.  Cut the hemming tape to line the outer 4 sides of the pillow and iron them the same way you did the first hems.

Give it a few minutes to cool down.  Now you can turn the cover right side out and insert your pillow.


Not sure why I didn't take a picture of the back of my pillows... So here's a random "googled" picture of how it should look.


$9 fabric plus $2 hemming tape isn't bad for two new pillows.  Believe it or not, you can do better than that!  They have fabric as low as $1.00 a yard.  Of course the one that was perfect for this little project was a bit pricier, but still a great deal.  Try it out instead of paying $30 a piece for new pillows. 

Wednesday, June 15, 2011

Traveling Treasures Mason Jars

If you're like us and you not only love to travel, but you love to pick up nick-nacks from your destinations, then you probably have a few pieces scattered around your house.  We always get an ornament for our Christmas tree, but we also pick up random things that catch our eye while on vacation.

In an effort to organize and use some Mason Jars that I just bought a case of, I made these "Traveling Treasures Mason Jars".  I think I've seen something similar to this in an old Better Homes and Gardens magazine.

You can find Mason Jars at any craft store.  I bought a case of 12, surprisingly, at Big Lots for under 8 bucks. 

What I needed:  My traveling treasures, Krylon Fusion paint in Satin White and a mason jar.  Start by removing the caps.


 The Krylon spray paint is awesome.  You don't have to prep, sand or prime prior to using.  I did a second coat after the first dried.

Then I got all our goodies from our trip to Jamaica, where Matt proposed, together. 


You can laugh at the Bob Marley rolling paper - of course we had to buy that! Our bellhop even tried to sell us some illegal substances and I'm not just talking marijuana.  Most people believe that Mary-Jane is legal in Jamaica, but in fact it is NOT. And you can get arrested there just like you'd get arrested here. Except its far more scary.

We also have a Jamaican $50 bill and some change.   It's probably about $1.65 in US money 'cause, ya know, we roll in the Jamaican dough.  You'll also find our plane tickets and the flag from Ricks cafe, one of the top 10 bars in the world. The locals cliff dive right there at the bar, right next to the sign warning you to jump at your own risk and "spinal injury may occur". Yeah... that's happening.


 I also did one from our trip to Hawaii.  I have more to do, but this was a good start.


I'm offically in love with mason jars.  They have so many different uses and are so inexpensive.  I hope I don't turn into the weird "mason jar lady" with random jars scattered through the house and even making it outside.  Pray for me.

PS if you say "Beer Can" with an English accent, it sounds like "Bacon" in Jamaiican.  Random and awesome.

Tuesday, June 14, 2011

I have another love, and his name is Craigslist

Don't worry, Matt knows all about him.  I visit him about once a week, sometimes 5 times a week if I'm feeling spunky (as in, bought a new house and "need" tons of stuff).  I've always wanted a briefcase side table, but I was not paying the $30-$60 for vintage pieces.  I can be a real cheap-o and since I needed 4 or 5 of them, the $120-$300 price tag for a side table just wasn't going to happen.  I gave up on my life-would-be-complete-with-you-in-it side table.

But then one random day I decided to check in on my friend Craigslist...  (you can visit him too at Craigslist.com in case you had no idea what/whom I was speaking of).  Low-and-behold, someone had listed 5 briefcases from the 60's and 70's...
FOR FREE.

Yes, f-r-e-e.  I couldn't believe it.  I also couldn't believe when she emailed me back and said they were still available.  AND if that wasn't enough, she drove out of her way to meet me and hand deliver these babies.


They were a littly musty and needed a good wipedown, but other than that - they were all in pristine condition, perfect for my stackable side table.  And that's literally all the work this took.  I stacked them up.  Boy am I crafty!  Make sure you write that down if you're planning on doing one too, 'cause this could get tricky.  ;)  Of course, when we decide to start having little Ogo's, we'll have to connect these and put some weights in the bottom suitcase. 

Anyhoo, here it is in our family room.


This is my first post about my main-other-man Craig, and certainly not the last.  Have you found an amazing-out-of-this-world deal on Craigslist lately?

Saturday, June 11, 2011

Removing wallpaper is the worst...

It's a sticky job... but someone's gotta do it.  Half of the master bedroom closet was covered with a textured wallpaper.  It looked like a DIY project gone wrong.  We all know how that goes.  It was bubbling, peeling, bumpy and everything else bad you can think of.  Here is a picture of the type of wallpaper it was.

I broke the blogging rule of taking a picture before I started, so about 10 minutes into peeling back the top layer of wallpaper I took these shots.  The left side of the closet is the wallpapered side.

 Here is Mya helping out... and my fugly toes.

 First I removed as much of the top layer as I could just by peeling it back.  Then I took a spray bottle and filled with hot water and a little bit of soap, just a couple of squirts.  I sprayed the entire wall where the bottom layer of wallpaper was left.  Then I took a spackle knife, started from the bottom and shaved off the wallpaper.  It actually came off really easy!  Be careful though, the glue on the wallpaper is sticky again so you should try to bag it up quickly/immediately if your room is carpeted.


You'd think that after all that we'd just have to paint and all would be well.  But no... it left this hole-ridden, spackled, unsanded mess of a wall.  Apparently that's why they covered it up with wallpaper and the reason for all the bumps and bubbling.


 I called in reinforcements, aka Matt, and respackled and sanded everything.


 Then we painted it good ol' fashion antique white.  Nothing fancy, but definitely an upgrade.


Have you found a DIY job to be much more than you bargained for? 

Friday, June 10, 2011

Let the exterior painting commence!

So I have a confession: Our exterior house picture doesn't really depict the actual color of the house.  *Gasp!  I know, I know, scandalous!  Honestly and truly, as I've mentioned before, the house is a not-so-appealing peachy-tan color.  But with the sun hitting the house just right, at just the right time in the morning, it looks very soft pink/off white.  Lighting is everything right?

I've fooled you!  Ha!

Ok, sorry.

Not only is the color something we could live without, it's also faded terribly since it's most likely the original 1991 paint.  Since the first time we saw the house, we knew it needed a fresh coat in a color that was more us.


Enter Pale Honey please!


So, Matt started painting this week.  It's a slow process considering he works full time and has to entertain me by listening to my ramblings or helping with projects when I'm home.  But he's been managing it all and it looks fantastic so far!  I'll share the process once we can do the big reveal.  Unfortunately, he's been painting while I'm at work so I haven't got any "action shots".  I'm only taking pictures after he's quit for the day.  Hopefully he'll take time to tell us all (including me) how it all got done and how much he hated being out there in the sun.  Of course the week he starts this process it's in the upper 90s all week.  He's the man.

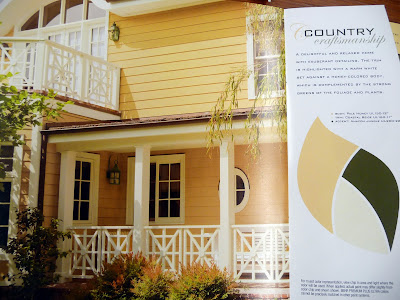
The color is from Behr and is shown below with the color code.  We didn't actually go with Behr paint, but got Sherwin Williams to color match it for us.  Matt swears by this particular SW exterior paint.  The picture above is a more accurate depiction of the color, the one below looks a little too dark peach and less yellow. 


Get this, I picked this exact color out of the hundreds of paint chips at Home Depot.  Then I grabbed one of their 5 or 6 page exterior books to see some images for ideas.  I got to the page with the pictures above and knew it was the one.  I hurried and showed Matt while exclaiming "Nevermind that other color, I SOOO love this".  Only to find out it's the same exact color chip I've already given him.  Well, at least I'm consistant.

Anyhoo, I'm so excited for the exterior to get done and put a big fat check mark next to a considerable project.  Onward with bringing the house back to its former glory!